
Use Labels and filters to organise your inbox
A lot of people are happy to just let their emails float around in their inbox uncategorised. Sounds like risky business to me, what if one day you need to find an important email that’s suddenly become the world champion of hide and seek? Labelling and filtering your emails is a great way to keep on top of your inbox game and keep everything organised and easy to find.
Give it a Label
Labels in Gmail are a great way to streamline your email management. You can use them to identify emails from specific clients or companies, keep tabs on task updates and create organised email categories, similar to subfolders. Labels also help you spot emails that need follow-up and important messages that you might need to refer back to later.

How to create a label:
- Open Gmail
- On the left, scroll down on the side panel and click More.
- Click Create New Label.
- Name your label.
- Click Create.

After creating your label, you can apply it to your emails in two ways: by selecting multiple emails and clicking on “Labels” at the top of your Gmail window, or by opening an individual email and selecting “Labels” at the top of the email window.
Now set up a filter and add some rules
Filters help you categorise emails by sending them to specific labels, or help you automatically archive, delete, or star incoming mail. Imagine – email filing will be a breeze!
How to create a filter:
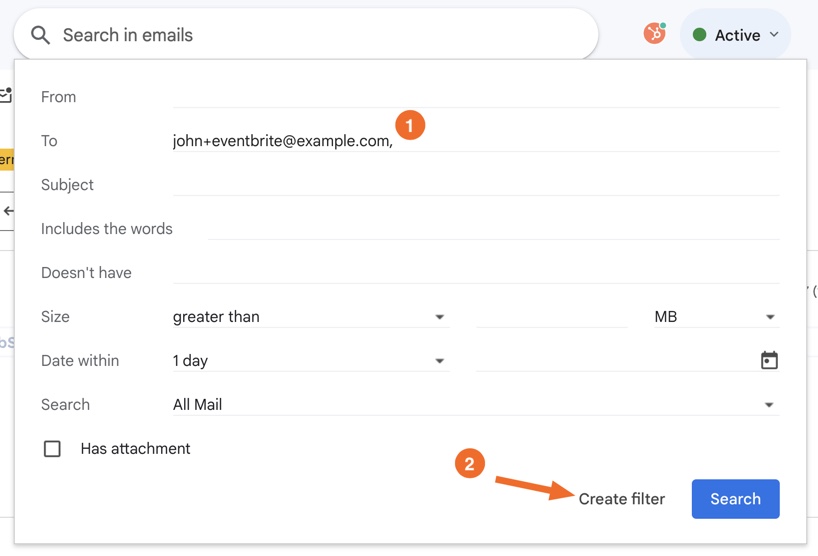
- Open Gmail.
- In the search box at the top, click Show search options
- Enter all the search information you need (such as a specific person, or any email address ending in @companyname.com)
- Click Create Filter at the bottom of the window
- Choose what you’d like the filter to do* (i.e create some rules)
- Then click Create Filter at the bottom again.
Important: If you set up a filter to forward messages, it will only apply to new messages. Also, when someone responds to a filtered message, the reply will only be filtered if it matches the same search criteria.
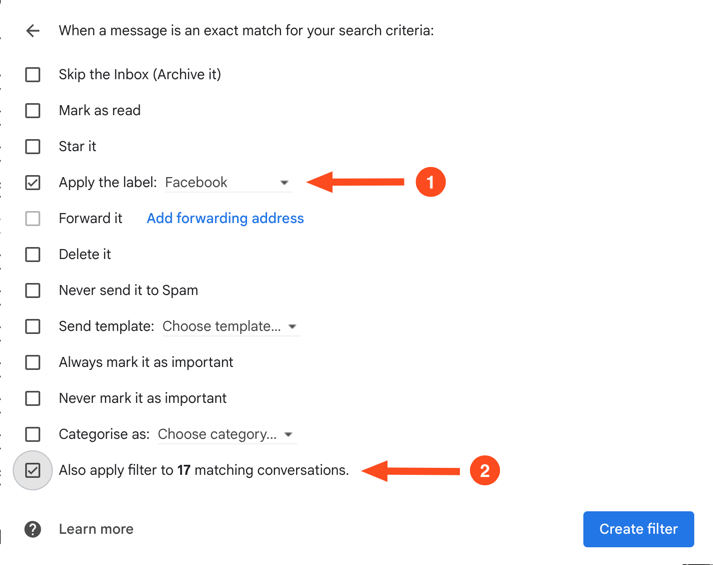
* As a more specific example, we’ve set up a filter with some rules to help us automatically label and categorise emails from Facebook. Once we selected the Facebook email and clicked Create Filter, we opted to apply a Facebook label to it and we also opted to apply it to any other matching conversations. This way all previously unlabeled Facebook emails from that email address will be labelled as well.
Delete or Change Filters
After a time, you might want to delete or change the rules of a specific filter. In this case, you can delete or edit it by simply going to your settings in the top right-hand corner, clicking on the filters and blocked addresses tab, finding the filter you’d like to change or delete and then clicking update filter or OK when you’re done.
Now, let’s kick it up a notch with Gmail Plus Addressing
Gmail plus addressing, also known as sub-addressing, lets you create receive-only variations of your regular email address that will still be delivered to your main Gmail inbox.
For example, if your email address was , and you signed up for an article you wanted to read, you could enter yourname+ as your email address in the sign-up box. Any emails sent to yourname+ will land in the inbox of .
But why Gmail plus addressing?
You might be thinking, if it all goes to your inbox anyway, why bother using Gmail plus addressing?
Well, the “+article” part of the plus address, can work as a “pre-label” and help you manage your emails and website registrations. Here are two examples:
- You can use plus addressing when you sign up for newsletters or articles. This makes it easier to sort and organise these emails. You can set up filters with rules to group these messages, making it simpler to find and manage them.
- You can also use plus addressing to create a “disposable” email address without having to create a whole new Gmail account. This can help prevent spam from cluttering your inbox. When you have to provide your email on a form, use a plus address. Once you’ve received what you need, you can set up a filter to automatically delete anything else that comes from that website into your account.
Protect your Data
Plus Addressing is also a handy way to figure out which websites are giving your information to others. If you start getting emails from a website you don’t remember signing up to, it’s probably because they got your email from a website where you did sign up. By using plus addressing, you can find out which website shared your email address and block them immediately.
No more playing around – Label and Filter your Emails in Gmail – Organise Your Inbox like a Pro
At the end of the day, using labels, filters, and Gmail Plus Addressing can help you manage your emails effectively. Labels make it easier to find important messages, filters automate actions, and Plus Addressing simplifies email organisation. These tools can bring order to your inbox and make email management a breeze. Don’t let your emails trick you into a game of hide and seek, take charge and organise your digital communication like a pro today!
For more Google Workspace Updates, click here.


